
Crochet stitch markers are sometimes underestimated. But these small allies can make our lives a lot easier. Whether you’re a beginner or an experienced crocheter, finding creative ways to use stitch markers can enhance your projects, save time, and help keep your work organized.
In case you don’t already know, stitch markers are small tools used to indicate specific points in your work. As you will see later in this post, they come in various shapes, sizes, and materials, such as plastic, metal, or even handmade from beads and charms.
In this post, I listed 17 practical ways to utilize your crochet stitch markers, helping you to crochet smarter, not harder. Let’s dive in and discover how these tiny tools can make a big impact on your crocheting experience!
This post may contain affiliate links. This means that if you make a purchase, I will receive a small commission at no extra cost to you. All opinions are my own. You can read my Privacy Policy here.

Leia esse post em português aqui.
You will find in this post…
Use your Stitch Markers to…
1. Mark the Beginning of a Round
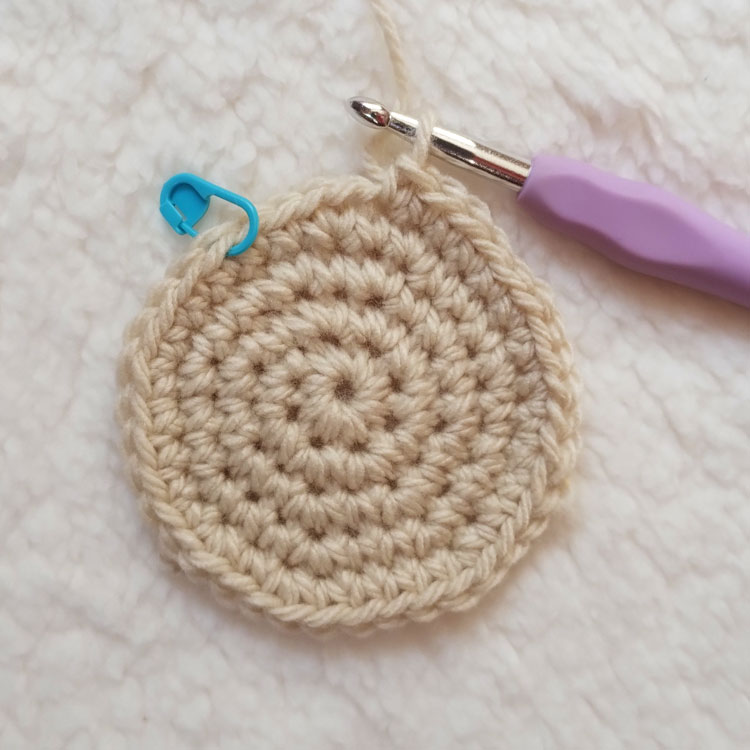
Place a stitch marker at the beginning of each round to keep track of the starting point in circular projects. This helps you know where each new round starts, making it easier to maintain consistent stitch counts and patterns.
2. Mark the Beginning and/or End of a Row
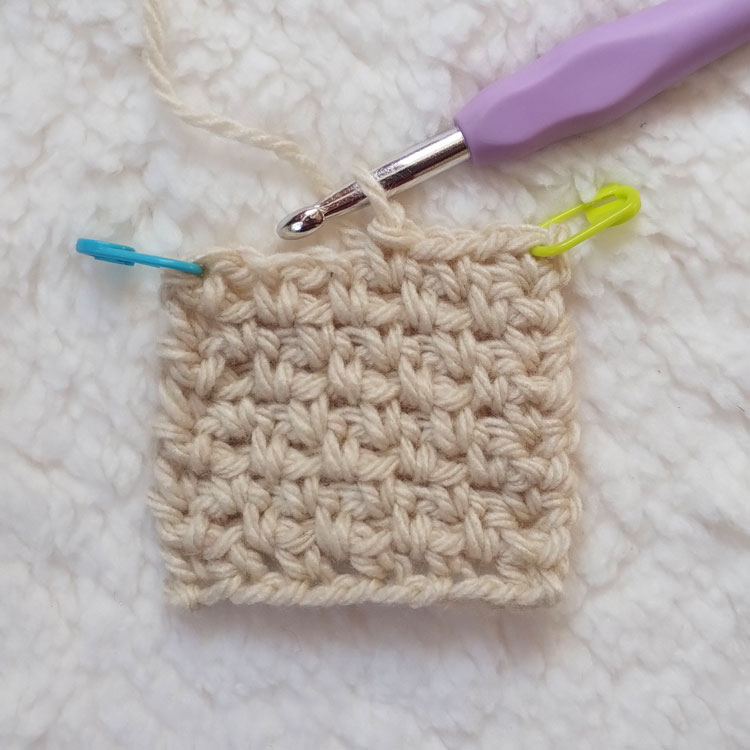
For beginners, marking the start and end of a row can prevent missed stitches. Place a stitch marker in the first and last stitches of the row to ensure you don’t skip or add extra stitches, keeping your edges straight and even.
3. Indicate Pattern Repeats
When working with complex patterns, use stitch markers to mark the beginning of each repeat. This makes it easier to follow the pattern and reduces the chances of making mistakes, especially with intricate designs.
4. Hold Dropped Stitches
Use a stitch marker to temporarily hold a dropped stitch, preventing it from unraveling. This way, you can take a break or store your project to continue later without risking unraveling what you’ve already done.
5. Mark Increase and Decrease Points or Rows
Place a stitch marker at these points to indicate where increases or decreases should occur. This ensures you make the changes in the right places, helping to shape your project correctly.
6. Identify Mistakes
Highlight areas that need correction by placing a stitch marker at the mistake. This makes it easier to frog (unravel) the work to the correct spot without losing your place, and it also serves as a reminder that there’s something there that needs fixing.
7. Track Stitch Counts

Use stitch markers to count stitches in long chains or large projects. Place a marker every 10, 15, or 20 stitches to easily keep track. This helps prevent errors in stitch counts, ensuring your project stays on track.
8. Keep Track of Rows (Count)

Mark every few rows with a stitch marker to make counting rows easier. This helps you track your progress and ensures consistency in patterns that require a specific number of rows.
If you prefer to use a row counter, that’s also an option. However, row counters are only useful if you actually remember to mark each new row. For me, that’s practically impossible, so stitch markers are my go-to choice.
9. Identify the Front of Your Work (Right Side)
Mark the right side of your work with a stitch marker to differentiate it from the wrong side. This is especially helpful in projects where the front and back look similar.
10. Indicate Special Stitches

Mark special stitches like bobbles or cables to ensure accuracy. This makes it easier to locate the right spots to place a special stitch and prevents the need to unravel your work to correct misplaced stitches.
11. Mark Join Points

When joining pieces together, place stitch markers at the points where they need to be joined. This helps align the pieces correctly, ensuring a neat and professional finish.
12. Pin Pieces for Joining
Hold pieces in place with stitch markers when joining or sewing crochet pieces together. This keeps them aligned and makes the joining process easier.
13. Color Coding
Use different colored stitch markers for different purposes, such as one color for increases, another for decreases, and so on. This helps you quickly identify the purpose of each marker at a glance. If you have trouble distinguishing colors, you can use different types of markers for the same purpose.
14. Clip Project Details
Use stitch markers to clip project details, such as pattern notes or yarn labels, to your project. This keeps everything organized and easy to reference.
15. Mark Temporary Placeholders

Use stitch markers as temporary placeholders for buttons, pockets, or other embellishments. This allows you to try out different placements before sewing them permanently.
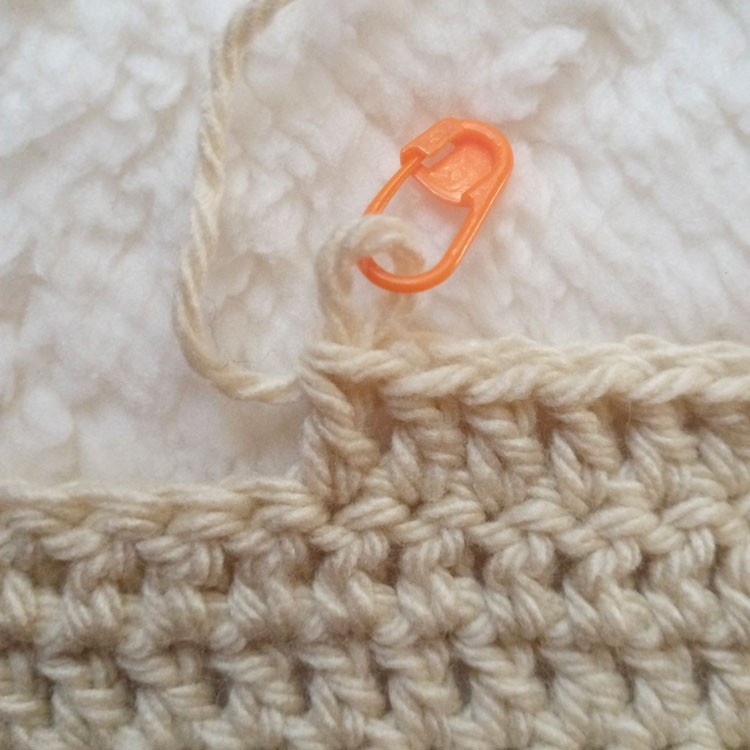
16. Keep a Stitch Open
Some stitches, like the last stitch on the row or the first in the round, tend to “shrink,” making it difficult to go through with the hook. Use a stitch marker to keep these stitches open and easily accessible.
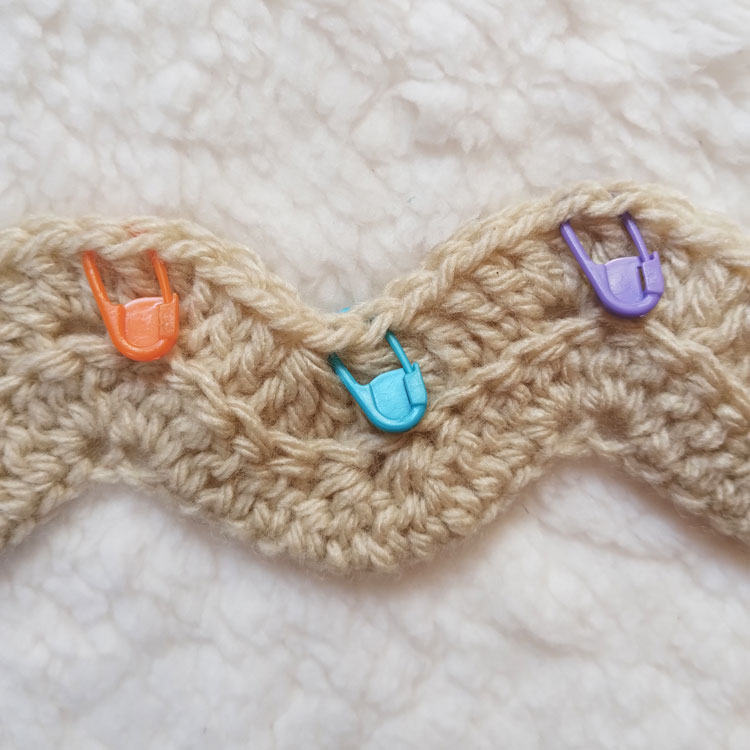
17. Help with Difficult Yarn
When working with fluffy or multicolored yarn, even if you are an experienced crocheter, you might want to use stitch markers to help distinguish special stitches. This will make it easier to see them, reducing frustration and mistakes.
Types of Stitch Markers
Now that we’ve seen all the different ways we can use crochet stitch markers, let’s take a quick look at the types of stitch markers available and their features.
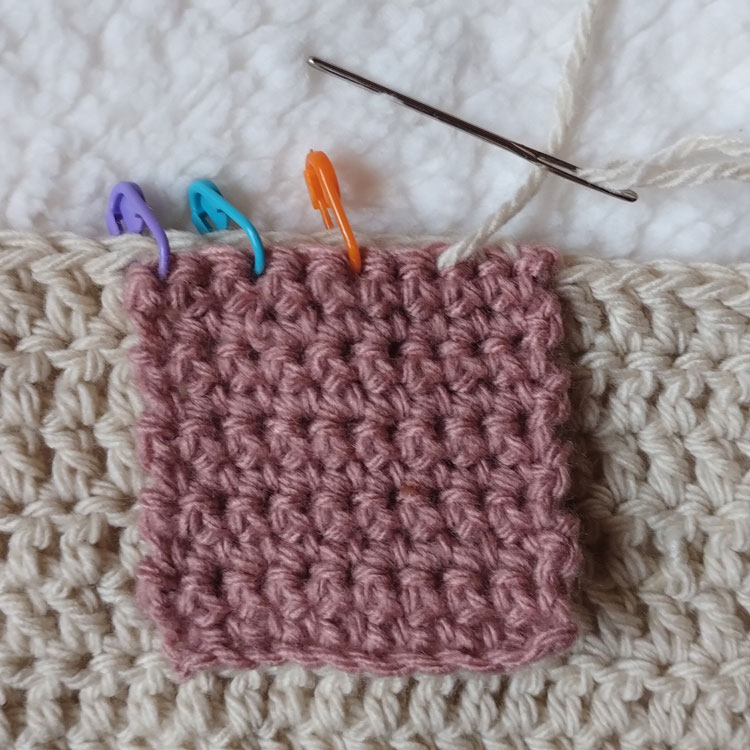
Locking Stitch Markers

Plastic
Plastic Locking Stitch Markers are my absolute favorites! Their bright colors are easy to spot, and they’re lightweight, so they don’t weigh down your work. They can sometimes be a bit tricky to close, but once they’re on, they stay put. You won’t have to worry about one of your markers falling out.

Metal
Metal Locking Stitch Markers, also known as bulb pins, are durable and great for thicker yarns. Their sturdy construction ensures they won’t break easily. However, their sharp points can sometimes snag delicate fibers, so be cautious with more fragile yarns. Nevertheless, their reliability and versatility make them a solid choice for many crocheters.
Split Ring Stitch Markers

Split Ring Stitch Markers are convenient because they slide onto your stitches with ease. They’re quick to use and remove, which is great for fast-paced projects. However, they tend to fall out, which can be frustrating. Be careful to choose the right size, as they are thicker than other markers and can stretch tighter stitches.
Stitch Markers with Numbers and Letters

Stitch Markers with Numbers and Letters are quite useful for counting rows and stitches or marking specific parts of your pattern. They help keep track of complex patterns and ensure you don’t lose your place. However, they can be a bit bulky and might interfere with your crocheting flow, but their organizational benefits often outweigh this minor inconvenience.
Decorative Stitch Markers

Decorative stitch markers are both functional and stylish, adding a personal touch to your crochet projects. These markers often feature charming beads, colorful charms, or themed shapes, attached with lobster clasps for easy use. While they bring a bit of flair to your work, be aware that their intricate designs can sometimes get caught in the yarn.
Ring Stitch Markers

Ring Stitch Markers are perfect for knitting, but they do not work for crochet! They fit snugly over knitting needles, marking important points in your knitting projects. Unfortunately, they can’t be attached to crochet stitches, so crocheters will need to look elsewhere. For knitters, though, they’re a simple and effective tool.
Alternative Stitch Markers
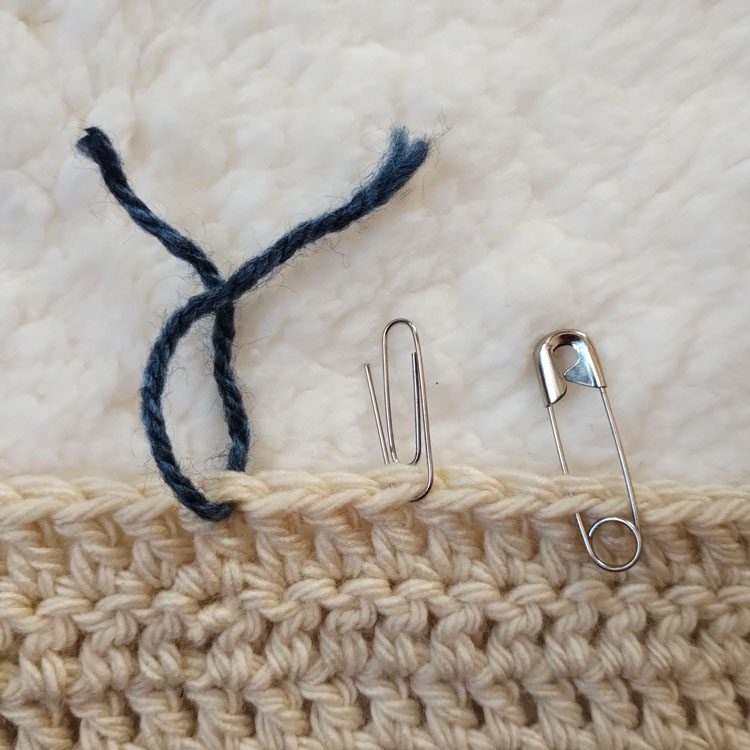
If for whatever reason you don’t have one of the stitch markers shown above, there are other things you can use instead. The most commonly used are:
- Safety pins are a solid choice, but be careful not to pinch or split your yarn with their sharp points.
- Bobby pins can work, but cheap ones might oxidize and stain your yarn (been there, done that!).
- Paper clips are an option, though I personally find them difficult to use.
- Pieces of thread can be tied around stitches as temporary markers, offering a flexible and easy-to-see alternative.
A Few More Tips About Crochet Stitch Markers
Be Careful When Placing Your Markers

When placing your stitch markers, make sure to insert them around the yarn rather than through it. This helps prevent splitting the yarn, which can weaken your project and make the marker difficult to remove. To avoid getting the marker tangled in your work, attach it to a single stitch and ensure it hangs freely. This will keep your project smooth and your markers easy to move.
Crafting Unique Stitch Markers
Create your own custom stitch markers using beads, charms, or other craft supplies. String colorful beads onto thin wire or attach small charms to jump rings for a personal touch. You can also use polymer clay to sculpt fun shapes or repurpose small jewelry pieces. For more creative ideas, check out my Pinterest board here!
Finding the Perfect Fit for Your Stitch Markers
Choosing the right size and weight for your stitch markers is crucial. If the markers are too large, they can stretch your stitches and distort your work. Conversely, markers that are too small can be tricky to use and may get lost in your project. Heavy markers can also stretch your work and deform stitches, so opt for lightweight options that suit the thickness of your yarn.
Keeping Track of Your Stitch Markers
Stitch markers have a mysterious way of disappearing without a trace. That’s why it’s important to keep them organized and in their place. You can store them in your notions case or dedicated cases. If you don’t have specific cases, candy tins or pill bottles make excellent alternatives.
Stitch markers may seem like small, simple tools, but they can make a big difference in your crochet projects. From keeping track of your stitches to adding a touch of personality, these little markers are truly versatile. So go ahead, experiment with different ways to use them, and find what works best for you. Have fun getting creative with your markers!
I’d love to hear from you! Am I making the most of my stitch markers, or do you have a clever use that I should add to my list? Share your tips and ideas, and let’s keep our crochet game strong together!
Common Questions About Crochet Stitch Markers (FAQ)
Stitch markers are small tools used in crochet and knitting to mark specific points in your project, helping keep track of patterns, stitches, and progress.
Stitch markers come in various types, including locking markers, split ring markers, decorative markers, and more, each suited for different needs and preferences.
Locking stitch markers are versatile, durable, and stay securely in place, making them ideal for marking important points in your crochet projects without slipping off.
Yes, you can create custom stitch markers using beads, charms, wire, or other craft supplies.
You can use safety pins, bobby pins, paper clips, or pieces of thread as alternative stitch markers. Each has its pros and cons, but they can be handy in a pinch.
Choosing the right size marker is important; too large can stretch your stitches, while too small can be difficult to use. Lightweight markers are best to avoid distorting your work.
Place markers every 10 or 20 stitches in long chains or large projects. This helps keep track of your count and prevents errors in your stitch count.
Yes, using stitch markers to mark pattern repeats or special stitches can make following complex patterns easier and reduce mistakes.
Place markers at points where you need to increase or decrease stitches to ensure accuracy and keep your project shaping correctly.
Decorative stitch markers add a personal touch and are fun to use, but be cautious as intricate designs can sometimes snag on your yarn.
No, ring stitch markers are designed for knitting and fit over needles. They don’t attach to crochet stitches, so crocheters should use other types.